User's Guide
Service outage announcement
GPXEV (GPX Editor and Viewer) will be out of service at the end of May 2022.
Please refer to the link below for details.
- 1. Launch application
- 2. Menu
- 3. Marker
- 3-1. Waypoint
- 3-2. Waypoint Marker
- 3-3. Waypoint Information
- 3-4. Name Marker
- 3-5. WptType marker
- 4. Load GPX file
- 5. Route List Dialog
- 5-1. Basic specifications
- 5-2. Add route
- 5-3. Collapse trkType (trk) route
- 5-4. Change route order
- 5-5. Concatenate route
- 6. Waypoint List Dialog
- 6-1. Basic specifications
- 6-2. Split route
- 7. Waypoint Dialog
- 7-1. Property
- 7-2. Error checking
- 7-3. Link
- 7-4. Name Marker
- 7-5. Locked waypoint
- 7-6. Scale change
- 7-7. Automatically split latitude and longitude
- 8. Route Edit
- 8-1. Move waypoint
- 8-2. Add or Remove waypoint
- 8-3. Route Edit Mode
- 8-4. along the road mode
- 8-5. Shortcut menu
- 9. Keyboard operation
- 9-1. Menu
- 9-2. Dialog
- 9-3. Google Maps
- 10. Route View Dialog
- 11. GPX Metadata Dialog
- 12. Track Metadata Dialog
- 13. Elevation Dialog
- 14. Tool Dialog
- 15. Marker Control Dialog
- 16. Map Control Dialog
- 16-1. Location
- 16-2. Place Search
- 16-3. Style
- 16-4. Option
- 17. CGI Parameter Dialog
- 18. Save Dialog
- 18-1. Save GPX file
- 18-2. Save Option Dialog
- 19. Temporary storage of editing data
- 20. Configuration Dialog
- 20-1. Path
- 20-2. Waypoint
- 20-3. GPX
- 20-4. Metadata/Help
- 20-5. Other
- 21. Custom Color Palette Dialog
- 22. Extensions tag
- 23. Troubleshooting
- 23-1. Error Dialog
- 23-2. Exception Dialog
- 23-3. Google Maps API Error
- 23-4. Initialize
1. Launch application
GPXEV(GPX Editor and Viewer) is web based free software.
Please click the following link.
https://askz.sakura.ne.jp/gpxev/gpx_editor_and_viewer.cgigpx_editor_and_viewer.cgi
2. Menu
The toolbar gives users instant access to the most commonly used functions.
✱ This icon appears on the menu when you change the settings in the Configuration dialog.
The alphabet in parentheses is a shortcut key. However, unlike normal shortcut keys, the ctrl key is not used. For more information, see Keyboard operation.
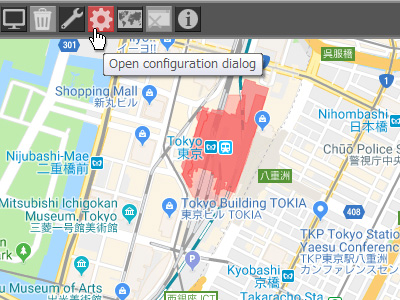
Tooltips appear automatically when you pauses the mouse pointer over a menu button.
3. Marker
3-1. Waypoint
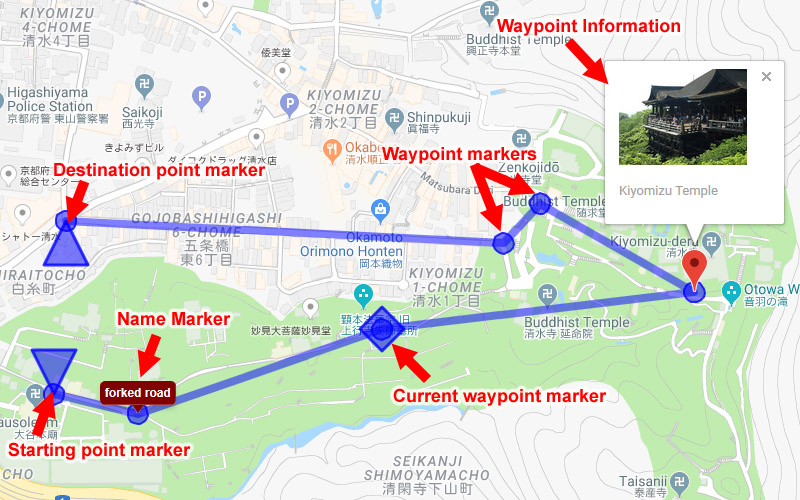
GPXEV displays 4 types of markers and 2 types of balloons on Google Maps.
- Stating point marker : This marker indicates the starting point of the route. The marker shape is a down pointing triangle.
- Destination point marker : This marker indicates the end point of the route. The marker shape is an up pointing triangle.
- Current waypoint marker : This marker indicates the currently selected waypoint. The marker shape is a diamond. You can move waypoints by drag and drop this marker on the map.
- Waypoint marker : This marker indicates the waypoint near the Current waypoint marker. The marker shape is a small circle.
You can change the shape of the marker in the Configuration Dialog.
3-2. Waypoint Marker

20 Waypoint Markers are displayed before and after the Current Waypoint.

If there are locked Waypoints in the currently selected route, 20 different color markers will be displayed before and after the Current Waypoint. Locked Waypoints are used in along the road mode.
3-3. Waypoint Information

If the image is linked, the waypoint information is displayed. GPXEV uses "href" attribute, "type" tag, "desc" tag to display images on Google Maps.
You can change the size of thumbnail in the Configuration Dialog.
You can hide the information window in the Marker Control Dialog.
3-4. Name Marker
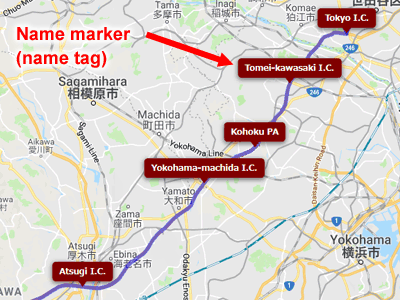
If you change the setting in the Waypoint Dialog or Marker Control Dialog, you can display "Name Marker" on the map. "Name Marker" shows the name of the Waypoint ("name" tag).
3-5. WptType marker

The marker of wptType is different from the marker of trkType and rteType and is displayed with the following specifications.
- A waypoint that has neither a link nor a Name Marker displays only Google standard markers.
- Linked waypoints display both Google standard markers and Waypoint Information.
- A waypoint with a Name Marker set displays only the Name Marker.
- A waypoint for which both a link and a Name Marker are set displays only the Name Marker.
This specification is because the wptType waypoint has no path information.
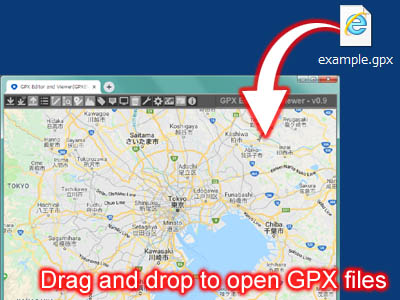
4. Load GPX file
There are four ways to load a GPX file.
- You can load a GPX file from the local file system by clicking the icon on the toolbar.
- You can load a GPX files over HTTP by clicking the icon on the toolbar.
- You can load GPX files by drag and drop.
- You can specify a GPX file as the CGI parameter at startup. See CGI Parameter Dialog for details.
[NOTE]
When reading GPX files on the Internet using HTTP, the server must allow CORS (Cross-Origin Resource Sharing). For details, please refer to restrictions.
You can also load a GPX file by drag and drop it to the browser.
5. Route List Dialog
5-1. Basic specifications
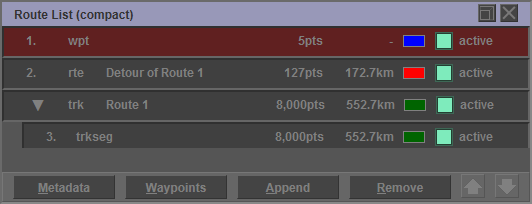
The "Root List Dialog" shows the loaded route. You can select route, change the color, change the visibility, or open another dialog.
There are 3 data types on GPX.
- trkType(trk) : It is generally a measured route by GPS and has a hierarchical structure. "trkseg" is a child of trk.
- rteType(rte) : It is generally a travel route created on a desk and has no hierarchical structure.
- wptType(wpt) : It is a non-consecutive waypoint. You cannot create more than one wpt.
[NOTE]
- When saving a GPX file, route data is output in the order of wpt, rte, and trk according to the GPX schema. Therefore, routes may not be output in the order displayed in the Route List dialog.
- The route distance is a theoretical value and may differ from the actual value.
There are 4 buttons.
- Metadata : Open the Track Metadata Dialog to edit.
- Waypoints : Open the Waypoint List Dialog.
- Append : Append new track(trk, trkseg), route(rte) or waypoints(wpt).
- Remove : Remove selected route.
5-2. Add route
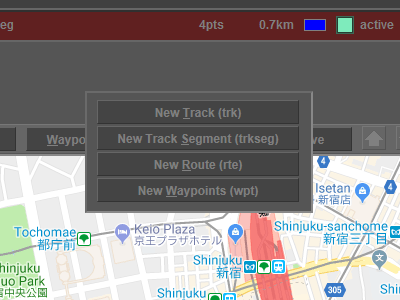
Click the "Append" button to display the popup menu. There are 4 buttons.
5-3. Collapse trkType (trk) route
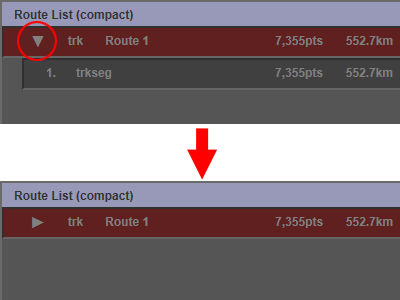
To collapse all trkseg, click the triangle icon.
5-4. Change route order
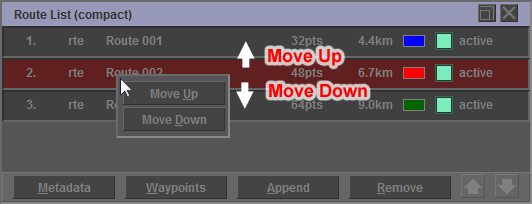
If you right-click on the selected route, a menu will be displayed to change the order of the routes.
- Move Up : Move the route up one position.
- Move Down : Move the route down one position.
trkseg cannot be moved outside of trk. If trk is moved, trkseg included in trk is also moved. Route data is output to a GPX file in the order of wpt, rte, and trk according to the GPX schema. Therefore, routes may not be output in the order displayed in the Route List dialog.
5-5. Concatenate route
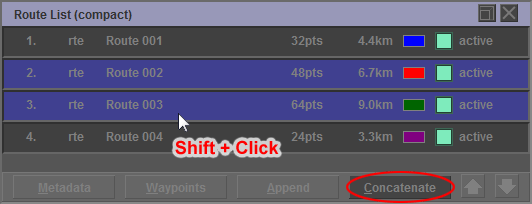
You can select multiple routes by holding down the Shift key and clicking the routes. If you have selected multiple routes, a Concatenate button will be displayed instead of the Remove button. If you click the Concatenate button, you can concatenate the selected routes.
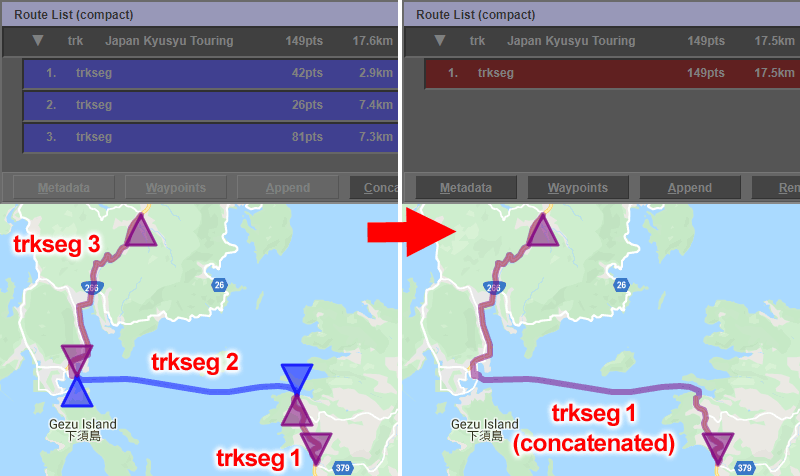
This process concatenates other routes after the top route. In other words, the order in which you click the routes is not related to the order in which you concatenate the routes. Also, different types of routes cannot be concatenated. For example, the route of trkType and the route of rteType cannot be concatenated.
6. Waypoint List Dialog
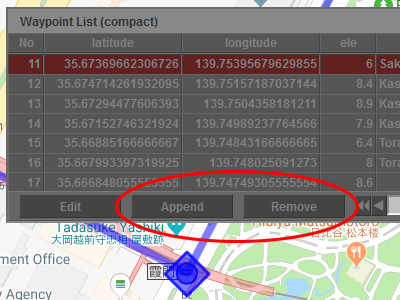
6-1. Basic specifications
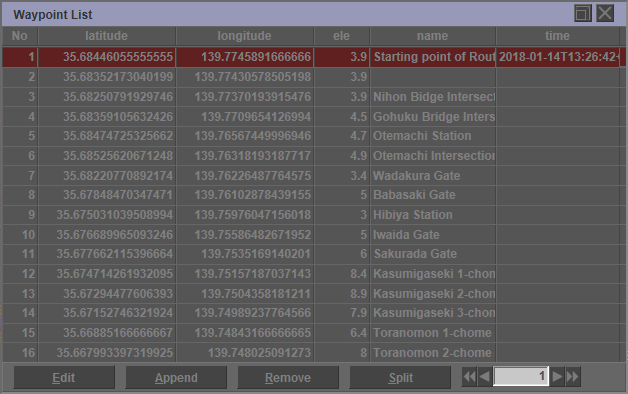
You can see a list of waypoints.
There are 3 buttons.
- Edit : Opens the Waypoint Dialog to edit waypoint properties.
- Append : Add a new waypoint.
- Remove : Remove the selected waypoint.
- Split : Split the route in two before and after the selected waypoint.
Please refer to the details for "Add or Remove waypoint".
6-2. Split route
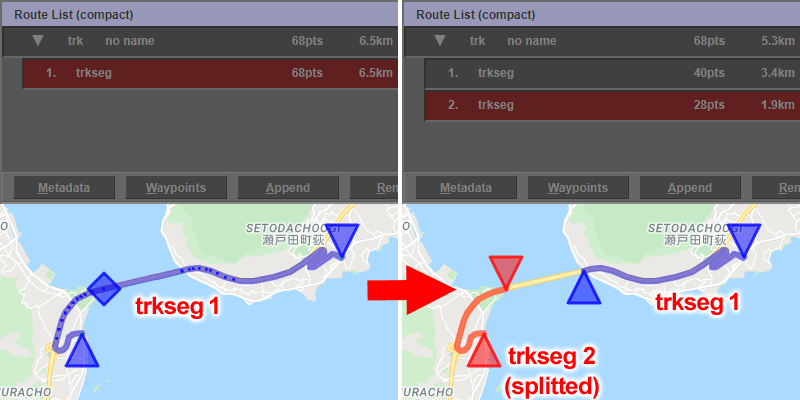
If you click the Split button, you can split the route into two. The selected waypoint will be the starting point of the route after division. The waypoint at the border between the two routes is not duplicated. Therefore, the destination point of the first route after division and the starting point of the second route are different.
7. Waypoint Dialog
7-1. Property
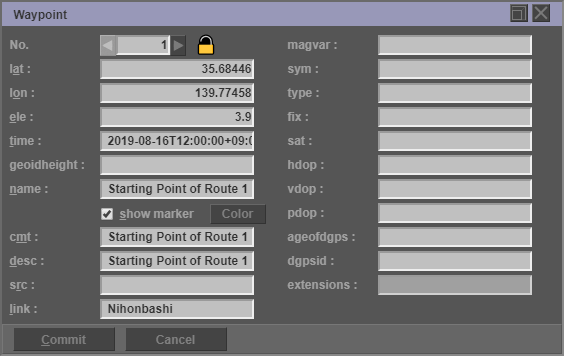
You can edit the waypoint properties. There are 20 kinds of waypoint properties.
- lat : The latitude of the point.
- lon : The longitude of the point.
- ele : Elevation (in meters) of the point.
- time : Creation/modification timestamp for element.
- geoidheight : Height (in meters) of geoid (mean sea level) above WGS84 earth ellipsoid.
- name : The GPS name of the waypoint.
- cmt : GPS waypoint comment.
- desc : A text description of the element.
- src : Source of data.
- link : Link to additional information about the waypoint.
- magvar : Magnetic variation (in degrees) at the point.
- sym : Text of GPS symbol name.
- type : Type (classification) of the waypoint.
- fix : Type of GPX fix.(none, 2d, 3d, dgps or pps)
- sat : Number of satellites used to calculate the GPX fix.
- hdop : Horizontal dilution of precision.
- vdop : Vertical dilution of precision.
- pdop : Position dilution of precision.
- ageofdgps : Number of seconds since last DGPS update.
- dgpsid : ID of DGPS station used in differential correction.
- extensions : The "extensions" tag cannot be edited.
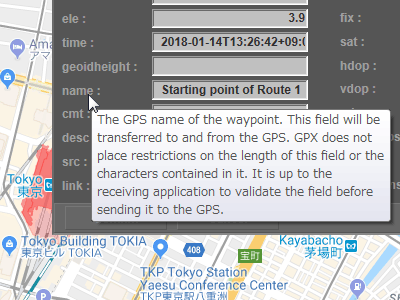
Tooltips appear automatically when you pauses the mouse pointer over a waypoint item.
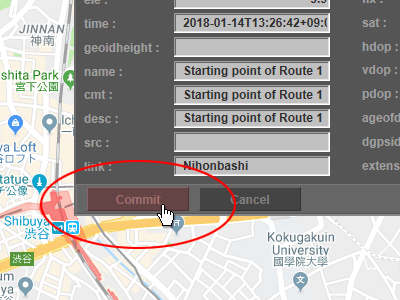
Click the "Commit" button to confirm the edited content.
7-2. Error checking
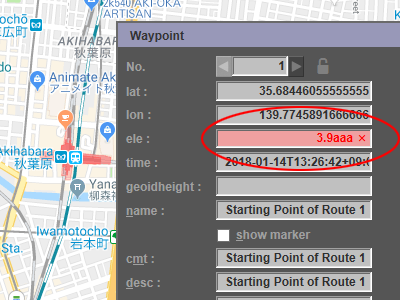
You can check errors at any time on input. If there is an error in the input value, the text box will be displayed in red.
7-3. Link
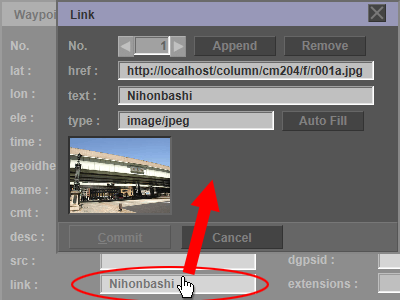
Click the link field to open the "Link Dialog". You can edit additional information about the waypoint in the "Link Dialog". In general, describe the URL of the image of the external site. This image will be displayed in the Google Maps.
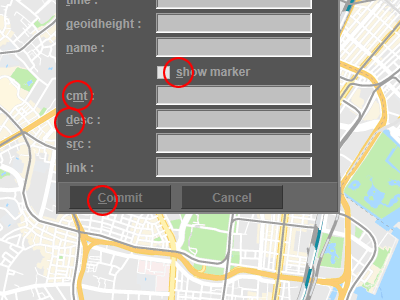
7-4. Name Marker

If you check the "show marker" checkbox, the Name Marker will be displayed on the Google map. It is used to display a balloon on the route. Name Marker displays the contents of "name" tag.
[NOTE]
If you want to save the Name Marker display state to a GPX file, turn on the "extensions" tag output setting in the Save Options Dialog.
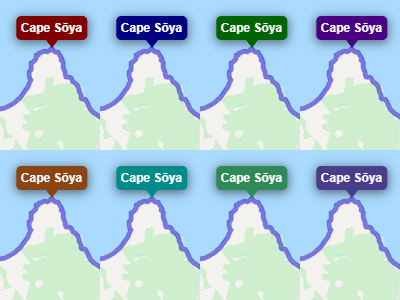
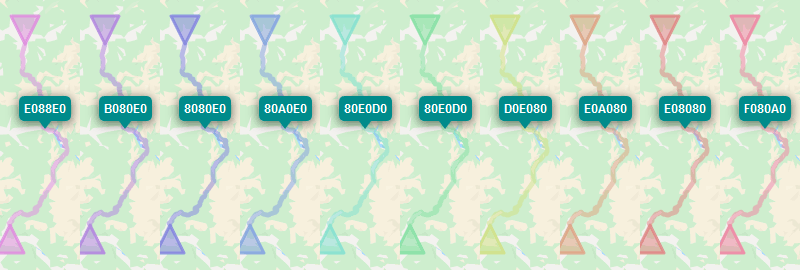
If you click the Color button, you can change the color of the Name Marker. You can choose from eight colors for the Name Marker.
7-5. Locked waypoint
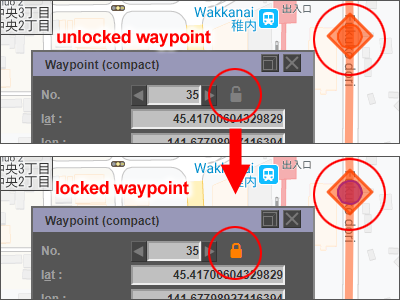
You can lock the waypoint by clicking the lock icon displayed to the right of the waypoint number. Locked waypoints are displayed in a different color and will not be overwritten in along the road mode. Also, Locked waypoints are not eligible for reduction.
[NOTE]
If you want to save the lock state to a GPX file, turn on the "extensions" tag output setting in the Save Options Dialog.
7-6. Scale change

Click the scale change button to change the size of the dialog.
All items are displayed in the standard dialog. In the compact dialog, only frequently used items are displayed.
7-7. Automatically split latitude and longitude
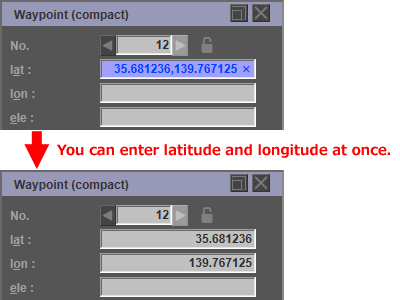
You can enter the latitude and longitude of waypoint together. If you enter comma-separated coordinates in the latitude text field, the text is displayed in blue. If you press the Enter key, the latitude and longitude will be automatically split and entered.
8. Route Edit
There are two types of route editing. The first is to edit in normal mode, and the second is to edit in Route Edit Mode.
8-1. Move waypoint
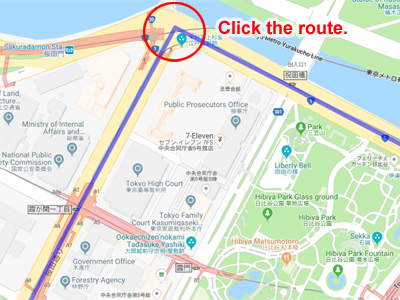
You can move the waypoint even in normal mode. Click the route near the waypoint you want to move.
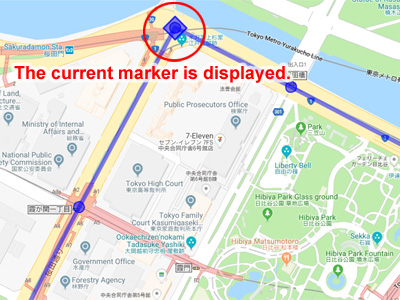
The current marker is displayed on Google Maps.
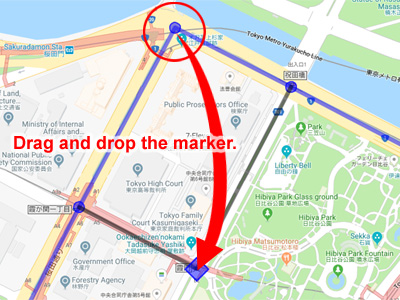
Click and drag the marker. Drop the marker to a different location.
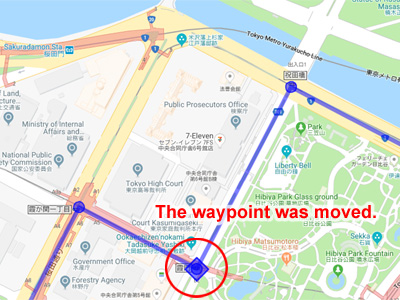
The waypoint was moved. If you set "along the road" in Route Edit Mode, you can draw a route along the road.
8-2. Add or Remove waypoint
There are three ways to edit the route.
- Use the Waypoint List Dialog
- Use the Route Edit Mode
- Use the Shortcut Menu
You can add or remove the waypoint by Waypoint List Dialog.
To remove the selected waypoint, click the "Remove" button.

To add a new waypoint after the selected waypoint, click the "Append" button.
If you selected a waypoint in the middle of the route, a new waypoint will be added in the middle of the next waypoint.
If you selected a last waypoint, a new waypoint will be added behind that waypoint.
8-3. Route Edit Mode
You can switch to the "Route Edit Mode" by clicking "Route Edit" button.
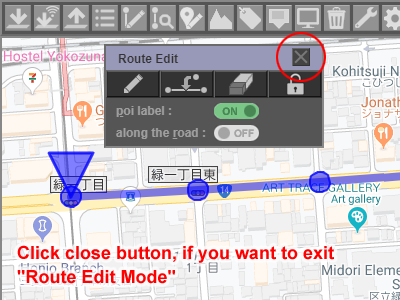
In "Route Edit Mode", operations other than route editing cannot be performed.
Click close button, if you want to exit "Route Edit Mode"
There are 4 buttons.
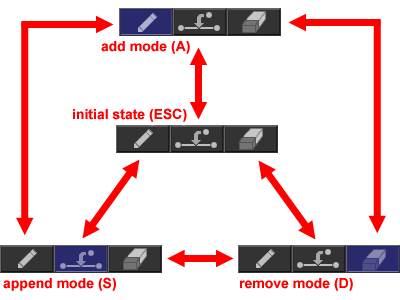
There are 3 toggle button. You can change mode by clicking these buttons. You can also change to each mode by pressing the A, S, D, ESC key on the keyboard.

In add mode, click on the Google map to add a waypoint to the end of the route. You can create a route by clicking continuously.

In append mode, clicking on the route line will add a new waypoint to the clicked location.

In remove mode, the waypoint on the clicked route is deleted.
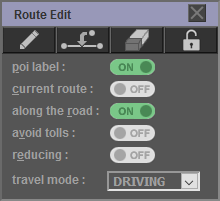
- poi label : Temporarily hide poi (point of interest) on the map. You can remove the labels of commercial facilities that are in the way when creating a route.
- current route : If you click on another route, it will not be selected. This is a function to prevent accidental clicks.
- along the road : Create a route along the road. For details, see along the road mode.
- avoid tolls : Exclude toll roads when searching for routes in "along the road" mode.
- reducing : Reduce the number of waypoints of the route searched in "along the road" mode. For details, see Batch processing (data reduction).
- travel mode : Select the mode of transportation. Some settings other than DRIVING are not supported by Google Maps in some countries.
Shortcut key
In the route edit mode, the following shortcut keys are assigned in addition to the shortcut keys in the "Route Edit Dialog".
- Q, space : Select the next waypoint.
- W : Select the previous waypoint.
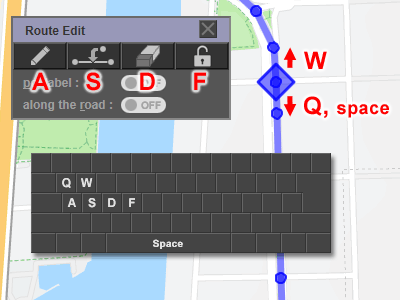
The shortcut key used in route edit mode is assigned to the upper left key of the keyboard.
8-4. along the road mode
8-4-1. Specification

You can draw a route along the road using the Google Cloud Platform Directions API.
The specifications of along the road mode are as follows.
- Each time you add a waypoint, it communicates with Google's servers to find a route. Therefore, it takes some time for the route to be drawn on the map.
- The add mode creates a route from "the locked waypoint one before" to "the coordinates on the clicked map".
If you move the waypoint by drag and drop, create a route between "the locked waypoint one before" and "the next locked waypoint".
[NOTE]
Waypoints that are not locked between two waypoints are deleted.
- Waypoints moved by drag and drop are automatically locked.
- Locked waypoints are displayed in a different color from the route color.
8-4-2. Locked waypoint
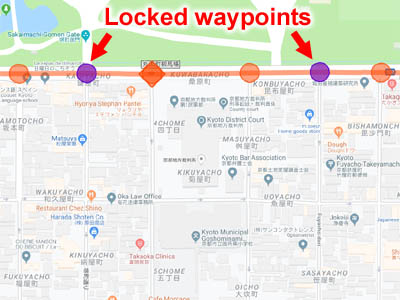
Lock waypoints you do not want to move. Locked waypoints change color.
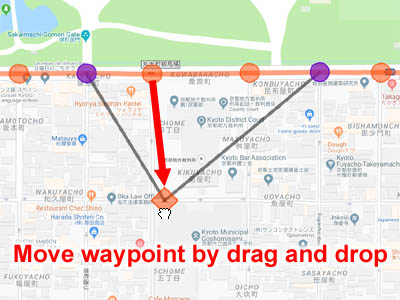
Drag and drop the waypoint on the route you want to change.

The new route searched by Google Cloud Platform is drawn on the Google map. At this time, the moved waypoint is automatically locked.
If the new route is different from the assumed route, you can search for another route by moving the waypoint again. It is recommended to keep the distance between two locked waypoints as short as possible.
8-4-3. Usage limit
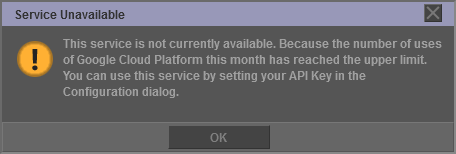
"along the road" mode uses the fee-based service of Google Cloud Platform. If the total usage fee for all users exceeds the Google Cloud Platform free tier ($200/month), you will not be able to use "along the road" mode until the following month. The above dialog is displayed during usage restrictions. See Usage Limits for more information.
8-5. Shortcut menu
8-5-1. Right click on waypoint
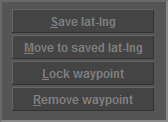
If you right-click on Waypoint, a shortcut menu will appear.
- Save lat-lng : Save Waypoint coordinates.
- Move to saved lat-lng : Move Waypoint to the stored coordinates. This can be used to move a Waypoint to the same coordinates as another Waypoint. You can also move to the coordinates of the search result of Place Search.
- Lock waypoint : Lock Waypoint. If you click on a locked Waypoint, you can unlock it.
- Remove waypoint : Remove Waypoint However, the Starting Waypoint and Destination Waypoint cannot be deleted.
All shortcut menus are available only when you right-click the Current Waypoint Marker.
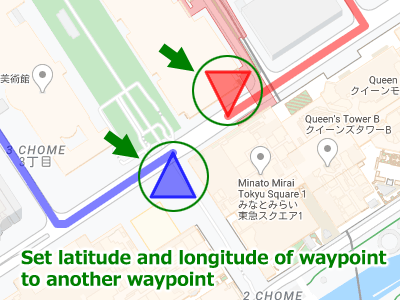
Using this shortcut menu, you can move two waypoints located at different locations to the same coordinates. For example, you can overlap the start of a route with the end of another route.
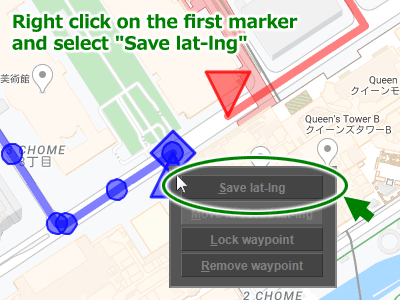
First, right-click on the first waypoint and select "Save lat-lng". This saves the coordinates of the first waypoint.
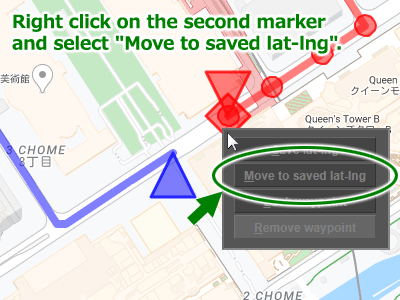
Next, right-click on the second waypoint and select "Move to saved lat-lng".
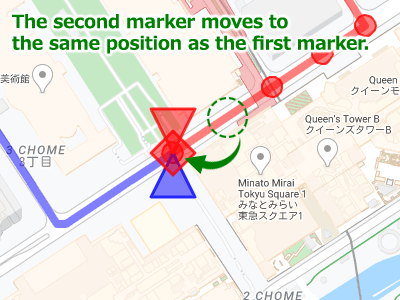
The second waypoint moves to the same position as the first waypoint.
8-5-2. Right click on the route line
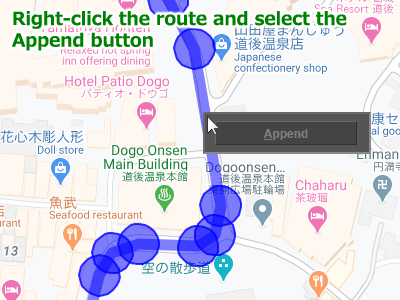
If you right-click the route displayed on Google Maps, a shortcut menu will be displayed. If you click the Append button in the shortcut menu, you can add a waypoint. This menu is also available in route edit mode.
9. Keyboard operation
9-1. Menu
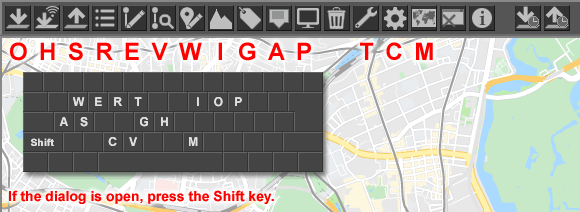
The menu also supports shortcut keys. Unlike normal shortcut keys, the ctrl key is not used. If the dialog is open, enter the shortcut key while holding down the Shift key.
9-2. Dialog
Each dialog supports shortcut keys. As with menus, the ctrl key is not used. However, shortcut keys are not intentionally assigned to controls that perform important operations such as the "Commit" button in the "Confirm Dialog".
9-3. Google Maps
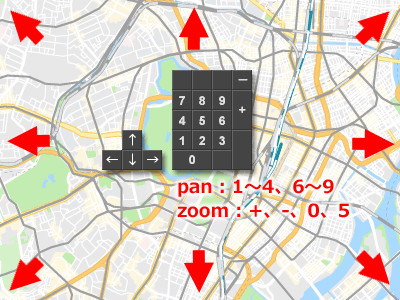
Google Maps can be operated with the numeric keypad or cursor keys. Press the numeric keypad "1-4", "6-9" or the cursor key to move the map. If you press "+", "−", "0" or "5" on the numeric keypad, the zoom ratio of the map is changed.
10. Route View Dialog
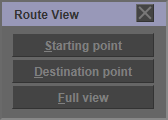
You can easily move the map in the "Route View Dialog" and Map Control Dialog.
There are 3 buttons.
- Starting point : Move the map to the starting point.
- Destination point : Move the map to the destination point.
- Full view : Change the center and zoom level of the map so that you can see all waypoints.

11. GPX Metadata Dialog
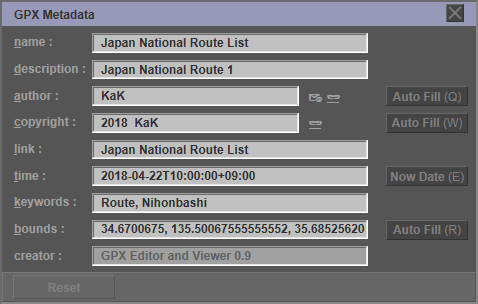
You can edit metadata of GPX in the "GPX Metadata Dialog". This metadata is top level metadata, common metadata for all routes. If you want to write metadata for each route, use Track Metadata Dialog.
- name : The name of the GPX file.
- description : A description of the contents of the GPX file.
- author : The person or organization who created the GPX file.
- copyright : Copyright and license information governing use of the file.
- link : URLs associated with the location described in the file.
- time : The creation date of the file.
- keywords : Keywords associated with the file.
- bounds : Minimum and maximum coordinates which describe the extent of the coordinates in the file.
- creator : The name of the software that created GPX file.
The "GPX Metadata dialog" has 4 types of buttons.
- If you click the "Auto Fill" button of "author", the default value set in the Configuration Dialog is automatically entered.
- If you click the "Auto Fill" button of "copyright", the default value set in the Configuration Dialog is automatically entered.
- If you click the "Now Date" button of "time", the current date and time are automatically entered.
- If you click the "Auto Fill" button of "bounds", detects the minimum and maximum coordinates from all routes and automatically enters the values.

Edit the author, copyright, link and bounds in the popup dialog.
12. Track Metadata Dialog
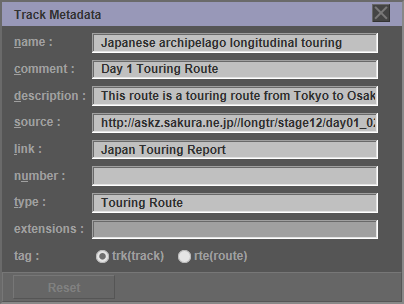
You can edit track of GPX in the "Track Metadata Dialog". This metadata is the metadata of individual routes. You can set the metadata to trkType(trk) or rteType(rte).
- name : GPS name of route.
- comment : GPS comment for route.
- description : Text description of route for user.
- source : Source of data.
- link : Links to external information about the route.
- number : GPS route number.
- type : Type (classification) of route.
- extensions : The "extensions" tag cannot be edited.
- tag : Route type. The current version cannot be changed from this dialog.
13. Elevation Dialog
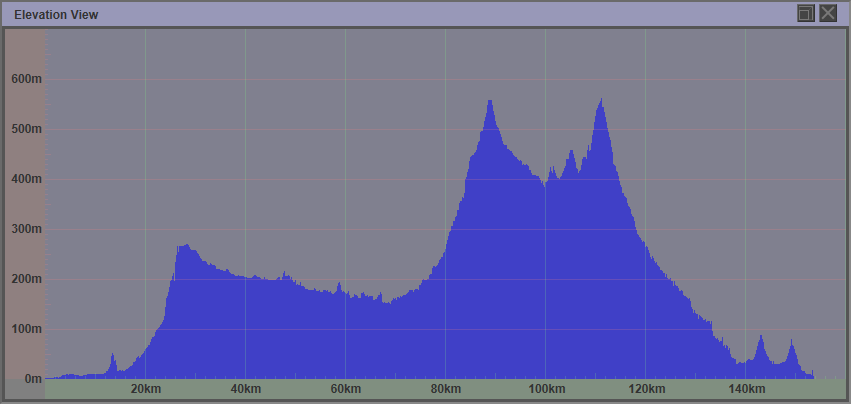
"Elevation Dialog" displays the elevation data.
If your GPX file does not contain elevation data, you can retrieve elevation data from Google servers. See Tool Dialog for details.
14. Tool Dialog
14-1. Google Services (Maps Elevation)

If your GPX file does not contain elevation data, you can retrieve elevation data from Google servers.
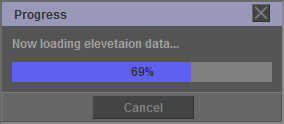
This command access to Google servers for requesting elevation data. It takes 5 seconds per 512 waypoints. You can also specify the number of significant digits of the elevation data. You can also specify the number of significant digits of elevation data. The initial value is one decimal place (0.1 meter).
If you click the "Reset data" button, you can delete all elevation data for the currently selected route.
14-2. Data volume reduction
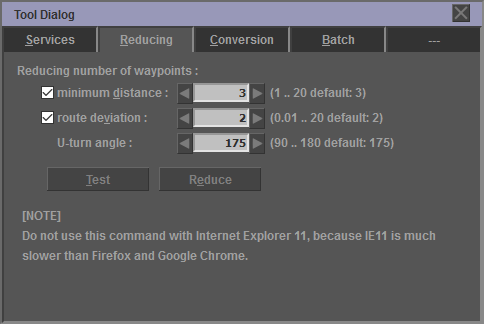
You can reduce the number of waypoints by clicking the "Reduce" button. Locked waypoints are not eligible for reduction. If you click the "Test" button, you can check how much the number of waypoints will be reduced.
For more information on this feature, see the Specification for Waypoint Data Reduction page.
- minimum distance : Minimum distance between waypoints (meter)
- route deviation : Allowable route deviation (meter) before and after removing waypoints
- U-turn angle : Threshold value of the course change angle to judge that you are making a U-turn
[NOTE]
- Do not use this command with Internet Explorer 11, because IE11 is much slower than Firefox and Google Chrome.
14-3. Data conversion
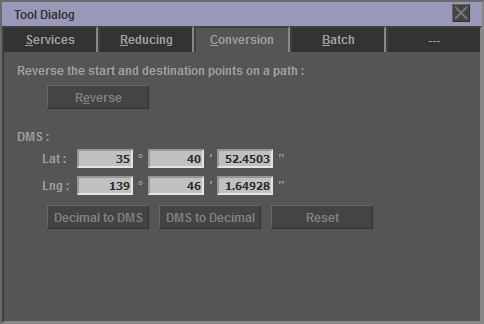
If you click the Reverse button, you can reverse the start and destination points of the selected route.
If you click the Decimal to DMS button, you can convert the latitude and longitude of the currently selected waypoint from decimal to DMS (degrees, minutes and seconds) format.
If you click the DMS to Decimal button, the entered DMS (degrees, minutes, seconds) format value will be converted to decimal and set to the latitude and longitude of the currently selected waypoint. However, you must click the Commit button in the Waypoint dialog to confirm the value entered.
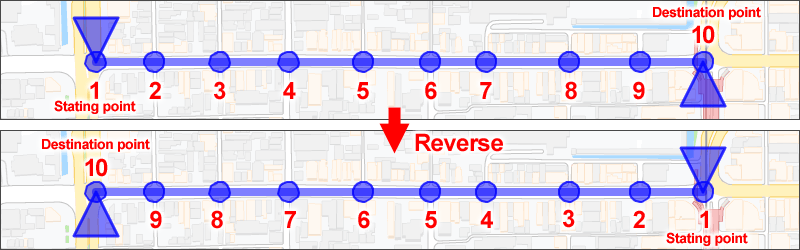
If you click the Reverse button, you can reverse the start and end points of the selected route. On the Google Maps screen, the display positions of the Starting point marker and Destination point marker are reversed.
14-4. Batch processing
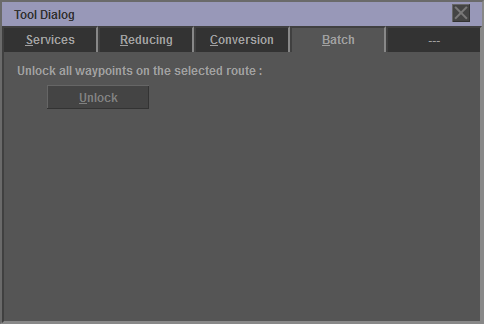
If you click the "Unlock" button, all waypoints of the selected route will be unlocked.
15. Marker Control Dialog
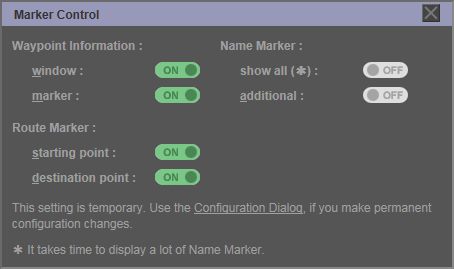
You can change the visibility of marker in the "Marker Control Dialog". This setting applies to all routes.
This setting is temporary. Use the Configuration Dialog, if you make permanent configuration changes.
Waypoint Information :
- window : This is the display setting of the Waypoint Information window (balloon). This setting overrides the setting in the Configuration Dialog.
- marker : This is the display setting of the marker of Waypoint Information. If this setting is turned off, the window setting will also be turned off.
Route Marker :
- starting point : It is the display setting of the marker that shows the starting point of the route.
- destination point : It is the display setting of the marker that shows the destination point of the route.
Name Marker :
- show all : If this setting is turned ON, the Name Marker will be displayed for all waypoints for which the name tag is set. This setting overrides the Waypoint Dialog setting.
- additional : It is the display setting of Name Marker specified by the argument of CGI.
[NOTE]
- It takes time to display a lot of Name Marker.
- Internet Explorer 11 has performance issues. Refer to Restrictions for details.
16. Map Control Dialog
16-1. Location
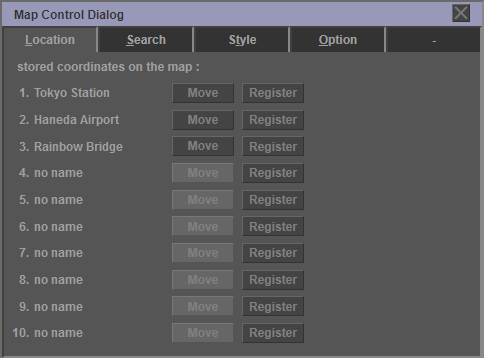
You can easily move the map in the "Map Control Dialog" and Route View dialog.
You can save your favorite locations on the map. There are 10 storage spaces. You can name the registered location.
- no name : If you click the "no name" string, you can give the registration coordinates any name.
- Register : If you click the "Register" button to register the center coordinates of the map and the zoom factor.
- Move : If you click the "Move" button, you can move the map to the registered coordinates and change the zoom factor.
Shortcut key
In this dialog, numeric keys "0" to "9" on the keyboard are assigned as shortcut keys. If you press the numeric key, you can move the center coordinates of the Google map, just like when you click the "Move" button. However, the numeric keypad is not supported.
16-2. Place Search
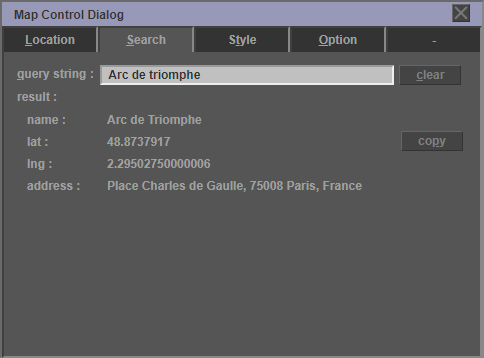
Click the Search tab to search for places on Google Maps. If you enter the name of the place to search, the center of the Google map will move to the coordinates of the search results. If you click the Copy button, the search result coordinates are copied to the clipboard.
- query string : Name of place to search
16-3. Style
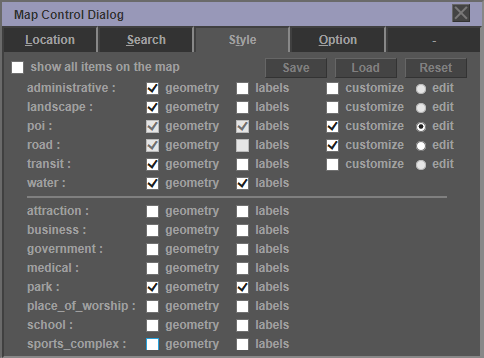
If you click the "Style" tab, you can select items to display on the Google map. Google Maps usually displays items such as administrative, landscape, buildings, roads, transit, and water areas. The "Map Control Dialog" can hide any item from Google Maps. If you click the "Save" button, you can save the style in a cookie.
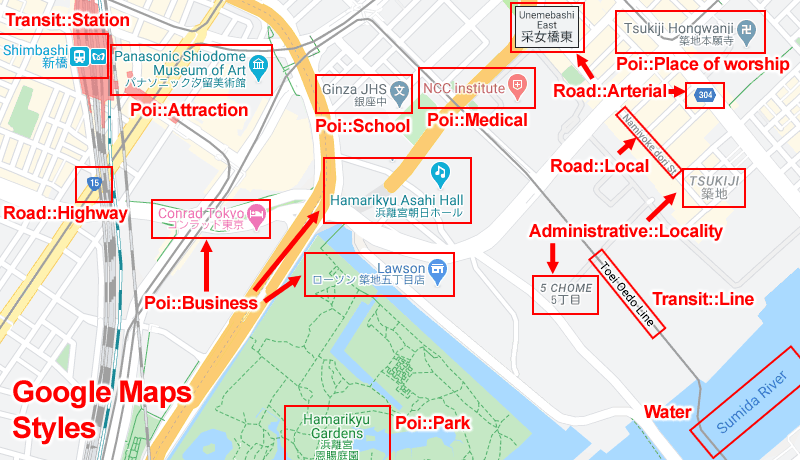
- administrative : country, land parcel, locality, province, and so on.
- landscape : man-made structure, natural, land cover, terrain, and so on.
- poi : attraction, medical, park, place of worship, school, sports complex, and so on.
- road : arterial road, highway, controlled access, local road, and so on.
- transit : railway, station, airport, bus stop, and so on.
- water : water area
Each item can be set to lower items by checking the "customize" checkbox.
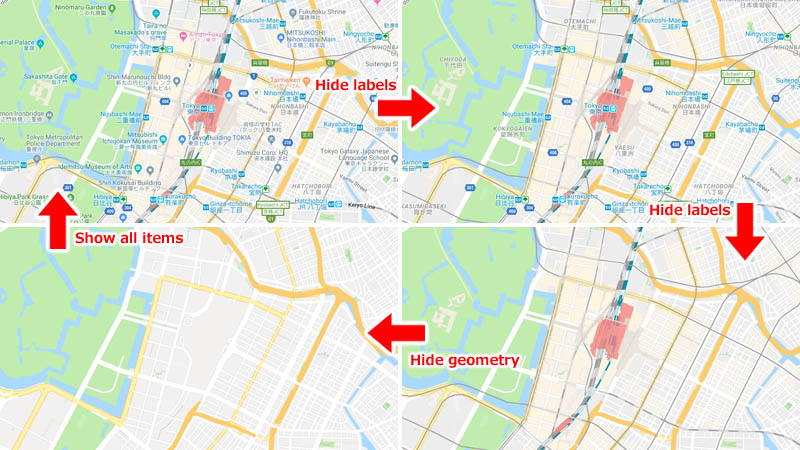
If you uncheck the "labels" check box, you can hide the labels displayed on Google Maps. Display ON / OFF can be set for each type of label. If you uncheck the "geometry" checkbox, you can hide roads, routes, stations, and various areas drawn on Google Maps. If you check the "show all items" checkbox at the top of the "Map Control Dialog", you can return all items to the displayed state.
16-4. Option
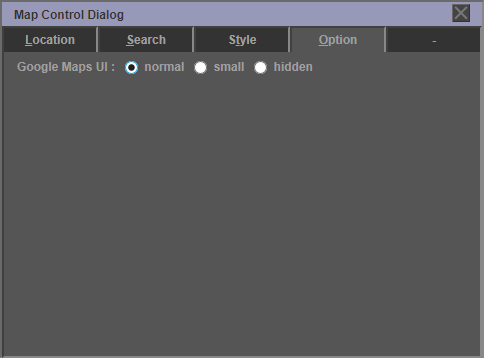
If you click the "Option" tab, you can change settings related to Google Maps.

You can change the size of the standard control icon of Google Maps. If you select "hidden", the standard control icon is not displayed. This setting takes effect when you reload the page.
17. CGI Parameter Dialog
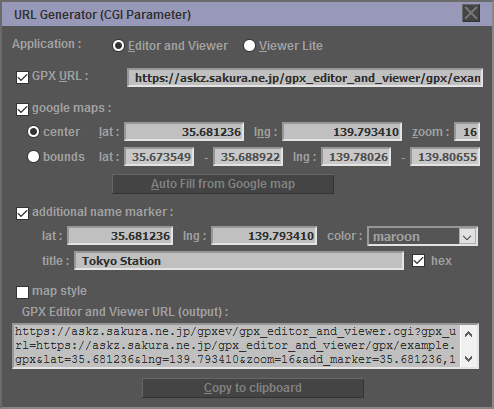
You can publish touring route by GPXEV. You can set the value of a CGI parameter in the "CGI Parameter Dialog". The CGI parameters that can be set are as follows.
- application : Select Editor and Viewer (GPXEV) or Viewer Lite (GPXVL). If you want to publish the route you created, select Viewer Lite (GPXVL). See GPX Viewer Lite for details.
- gpx_url : URL of GPX file. If you use http instead of https, the server must allow CORS (Cross-Origin Resource Sharing). See Restrictions for details.
- lat : Latitude of the center of Google Maps
- lng : Longitude of the center of Google Maps
- zoom : Zoom level of Google Maps
- bounds : Specify the initial display boundary of Google Maps. This value is specified in the format {"minimum latitude", "maximum latitude", "minimum longitude", "maximum longitude"}. However, when the lat, lng, and zoom arguments are specified, the value of bounds is ignored.
- add_marker : Specify the coordinates and title of Name Marker to be added on Google map
- map_style : Specify the map style set in the Map Control Dialog. The value of this argument is automatically generated when the checkbox is checked.
In addition to the above, the following parameters can be specified manually.
- starting_point : Set the display state of Starting Point. ("on" or "off")
- destination_point : Set the display state of Destination Point. ("on" or "off")
- name_marker : Set the display state of Name Marker. ("on" or "off" or "ignore")
If you specify "on", the marker will be displayed on Google Maps even if the GPX file does not have the extension tag. This is the state where the show all button of the Marker Control dialog is turned on.
If you specify "ignore", the marker will not be displayed on Google Maps even if the GPX file contains the extension tag. - api_version : Specify the Google Maps API version.
- api_key : Specify API key of Google Cloud Platform. Normally, set the API Key in the Configuration Dialog.
- mode : If you specify "init" for the mode argument, the Initialization Screen is displayed.
18. Save Dialog
18-1. Save GPX file
You can save GPX file to local file system.
- Click the button on the toolbar.
- Right click on the "GPX File" button and choose "Save link as". If you are using Firefox or Google Chrome, you can click the button to save the GPX file.
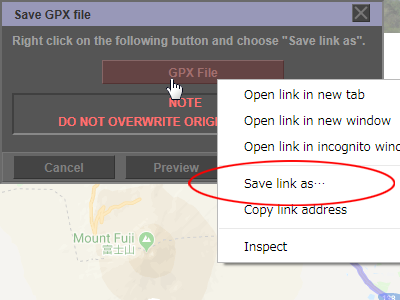
- Select GPX file.
NOTE
DO NOT OVERWRITE ORIGINAL GPX FILES.
18-2. Save Option Dialog
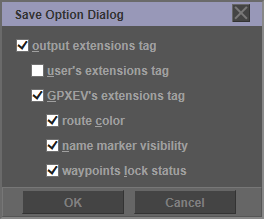
If Click the "Option" button on the "Save Dialog" opens the "Save Option Dialog".
- output extensions tag : Output the "extensions" tag.
- user's extensions tag : Output the "extensions" tag used by the user.
- GPXEV's extensions tag : Output the "extensions" tag used by GPXEV.
The "extensions" tag used by GPXEV can set output for each item.
- route color : Output the drawing color of the route on the map.
- name marker visibility : Output the display settings of Name Marker.
- waypoints lock status : Output waypoint lock status.
For details, please refer to extensions tag.
19. Temporary storage of editing data
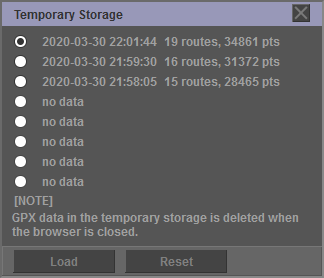
If you change the settings in the Configuration dialog, you can use the function to temporarily save the data being edited to memory. Up to 8 GPX data can be saved. The oldest data is automatically deleted when you save it for the ninth time. The temporary storage data records not only GPX data but also the center coordinates and zoom rate of the currently displayed Google map.
If you click this icon, the GPX data being edited is temporarily saved in memory.
If you click this icon, the Temporary Storage dialog will open. In this dialog box, you can load GPX data that has been temporarily saved.
- Load : Load temporarily saved GPX data.
- Reset : Delete all temporarily saved GPX data.
[NOTE]
- If you load the temporarily saved GPX data, the data being edited will be deleted.
- If you close the browser, all data stored temporarily will be lost.
- If you load the GPX data that is temporarily saved, the display order of the routes displayed in the Route List dialog may change. This is because it depends on the GPX schema.
In the future, we plan to implement a function to temporarily save data on the server side.
20. Configuration Dialog
20-1. Path

You can change your settings for GPXEV. The setting information is saved in the cookie.
If you click the "Path" tab, you can change the settings related to the route drawn on Google Maps.
Style :
- stroke weight : Set the thickness of the route drawn on the Google maps.
- ratio : Set the ratio between the zoom ratio of Google Maps and the thickness of the route to be drawn.
- stroke opacity : Set the opacity of the route drawn on the Google maps.
- color palette : Set the color of the route drawn on the Google map. You can select 16 colors from a 64-color palette. If you click the "Reset" button, you can initialize the color settings.
- Custom Color Palette : Create a custom color other than the default 64 colors. See Custom Color Palette Dialog for details.
- in order to change the route color : If this check box is checked, the root drawing color will be changed to the order of the color palette. By default, the first route is blue, the second route is red, and the third route is green. If the check box is cleared, all routes are drawn with the color set first.
Route List :
- collapsed by default : If you this checkbox is checked, the route list is collapsed and no child tracks appear in the Route List Dialog.
20-2. Waypoint
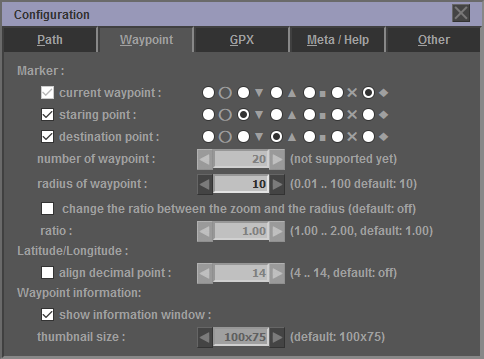
If you click the "Waypoint" tab, you can change the settings related to Waypoint to be drawn on Google Maps, such as the marker shape.
Marker :
- current waypoint : Changes the marker shape of the current waypoint. The initial value is a diamond.
- starting point : Changes the marker shape of the starting point. The initial value is a down pointing triangle.
- destination point : Changes the marker shape of the destination point. The initial value is an up pointing triangle.

- number of waypoint : Specify the number of waypoint markers to display on the map. The current version cannot be changed from a fixed value of 20.
- radius of waypoint : Specifies the size (radius) of the waypoint marker.
- change the ratio between the zoom and the radius : Change the ratio of the map zoom value to the waypoint marker radius. This item is disabled in the initial state. See the description below for more information.
- ratio : Specifies the ratio of the radius of the waypoint marker to the zoom value of the map. See the description below for more information.
Latitude/Longitude :
- align decimal point : Specify the number of significant digits of the latitude and longitude of the waypoint. This item is disabled in the initial state.
Waypoint information :
- show information window : If an image is linked to the waypoint, the Waypoint Information is displayed on the map.
- thumbnail size : Specify the size of the image to be displayed in Waypoint Information.
waypoint marker size (radius)
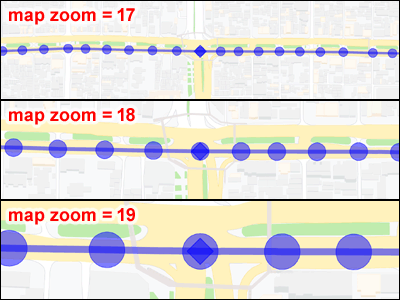
The size (radius) of the waypoint marker changes dynamically in proportion to the zoom value of Google Maps. The ratio is 1:1.
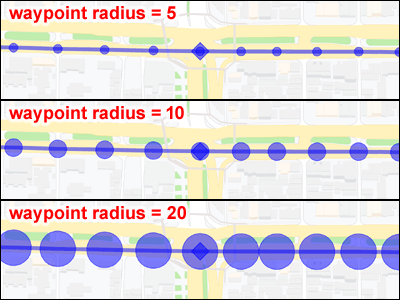
If you change the value of the radius of waypoint, the size (radius) of the waypoint marker will change. The initial value is 10.
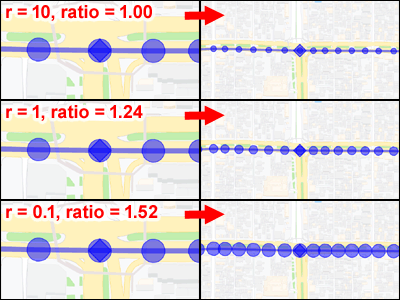
You can change the above ratio by checking the "change the ratio between the zoom and the radius" check box. If you increase the ratio value, the size (radius) of the waypoint marker will increase when you zoom out of Google Maps.
- If you are editing a route with dense waypoints, reduce the radius value. Also, increase the ratio value if necessary.
- If you want to edit the route while looking at the map from a bird's-eye view, increase the value of radius or ratio.
20-3. GPX
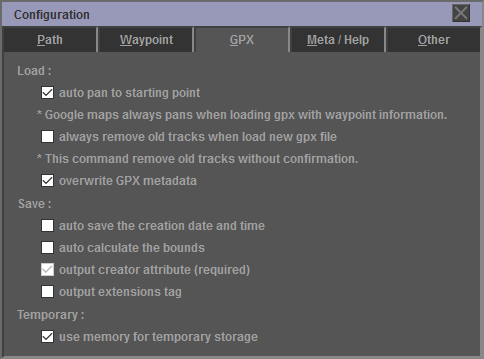
If you click the "GPX" tab, you can change the GPX file read and write settings.
Load :
- auto pan to starting point : Moves the Google map to the starting point of the route when loading a GPX file.
- always remove old tracks when load new gpx file : Delete all existing routes when loading a GPX file. Be careful when selecting this check box, as a confirmation dialog will not be displayed when deleting a route.
- overwrite GPX metadata : Overwrite existing GPX metadata when loading a GPX file.
Save :
- auto save the creation date and time : The "time" tag (creation date and time) is automatically generated when saving a GPX file.
- auto calculate the bounds : The "bounds" tag (four values of maximum latitude, maximum longitude, minimum latitude and minimum longitude) is automatically generated when saving a GPX file.
- output creator attribute : The "creator" tag is automatically set when saving a GPX file. You cannot change this setting in the current version.
- output extensions tag : Output "extensions" tags when saving a GPX file. For details, see extensions tag.
Temporary :
- use memory for temporary storage : If you check this checkbox, you can use the function to temporarily save the data being edited to memory. For details, refer to Temporary storage of editing data.
20-4. Metadata/Help
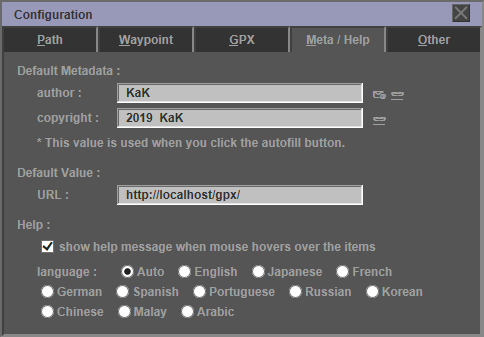
If you click the "Metadata/Help" tab, you can change the default metadata and help settings.
Default Metadata :
- author : Set the default value of author information.
- copyright : Set the default value for copyright information.
This value is used by clicking the "AutoFill" button in the GPX Metadata Dialog or Track Metadata Dialog.
Default Value :
- URL : Set the default value of the GPX file URL. This value is used as the initial value for the "Load GPX Dialog" and the CGI Parameter Dialog.
Help :
If this checkbox is checked, a tooltip will be displayed when the mouse hovers over menu and dialog controls. If "auto" is specified for "language", the browser language is automatically detected.
20-5. Other
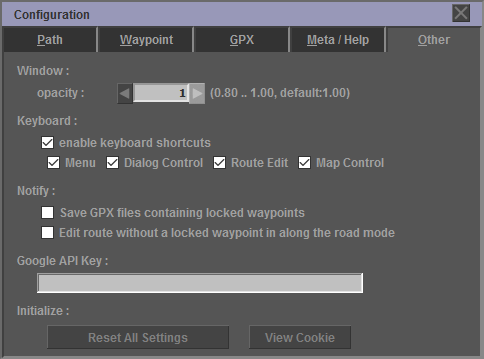
If you click the "Other" tab, you can change other settings.
Window :
- opacity : Specifies the opacity of the window.
Keyboard :
- enable keyboard shortcuts : Enable shortcut keys. However, unlike normal shortcut keys, the ctrl key is not used.
- Menu : Enable menu shortcut keys.
- Dialog Control : Enables the shortcut key for the dialog.
- Route Edit : Enable shortcut key in Route Edit Mode.
- Map Control : Enable shortcut keys for map operations.
Notify :
Specify the conditions for displaying the Notify dialog.
Google API Key :
Specify API key of Google Cloud Platform. If API Key is not specified, use the GPXEV API Key. However, some features may not be available if the free quota for the current month is exceeded. Please refer to the following page for how to get API Key.
Get an API Key : https://developers.google.com/maps/documentation/javascript/get-api-key
Initialize :
- Reset All Settings : Initialize all settings.
- View Cookie : Displays the settings stored in the cookie.
21. Custom Color Palette Dialog
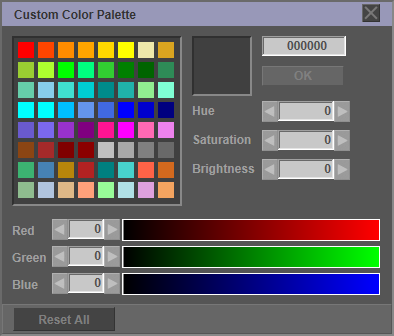
You can create a color other than the default 64 colors in the "Custom Color Palette Dialog". After selecting the color to change from the 64 color palette, change the color code, RGB or HSV value. If you click the "OK" button, the changed color is registered in the palette. The custom color is saved in a cookie. You can also save the route color in a GPX file using the "extensions" tag.
If you click the "Reset All" button, you can restore the color palette to its initial state.
22. Extensions tag
The specifications of GPXEV are as follows.
- GPXEV can load the GPX file in which the "extensions" tag is described.
- GPXEV outputs "extensions" tag when saving the GPX file. However, GPXEV will delete whitespace.
- The user can not edit the contents of the "extensions" tag.
- The user can not change "namespace prefix".
The specification of "extensions" tag used by GPXEV is as follows.
- style/route/color : The color to draw the route. GPXEV uses the value of extension in preference to the value of Configuration.
- style/wpt/marker/name : It specify the visibility of "Name Marker". When this tag is described, "Name Marker" is displayed only for the waypoint whose value is "true".
The output example of "extensions" tag is described below.
<gpxev:style>
<!-- Setting example of route display color -->
<gpxev:route>
<gpxev:color>Blue</gpxev:color>
</gpxev:route>
<!-- Setting example of Name Marker display -->
<gpxev:wpt>
<gpxev:marker>
<gpxev:name>
<gpxev:visibility>true</gpxev:visibility>
<gpxev:color>000080</gpxev:color>
<gpxev:name>
</gpxev:marker>
</gpxev:wpt>
</gpxev:style>
</extensions>
For XML Schema of "extensions" tag used by GPXEV, refer to the following URL. This URL is the attribute value of the namespace described in the GPX file.
https://askz.sakura.ne.jp/gpx_editor_and_viewer/xml_schema/0_4/xml_schema/0_4/
23. Troubleshooting
23-1. Error Dialog
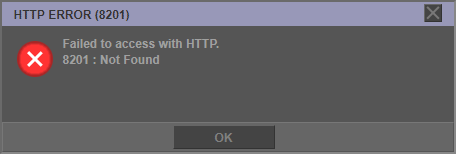
If an error occurs, an "Error Dialog" is displayed. Please recover or retry according to the content of the error message.
The error codes that can be recovered by the user are as follows.
- 1101 : GPX file parsing failed. There is an error in the XML structure. Check the contents of the GPX file.
- 1102 : An error occurred while parsing the GPX file. XML does not conform to GPX schema. Check the contents of the GPX file.
- 7101 : There is an error in the CGI parameters at startup. Correct the parameter.
- 8101 : The local file cannot be accessed. Check whether the specified file can be read and written.
- 8201 : HTTP access failed. Check the URL value or network status. Please see Restrictions.
The types of errors that can occur due to problems on the Google Cloud Platform side are as follows.
- 8301 : An error occurred in the Google Maps Elevation API.
- 8302 : An error occurred in the Google Maps Directions API. If you search a large number of routes in a short time, an OVER QUERY LIMIT error may occur. This is a limitation on the Google service side.
- 8303 : An error occurred in the Google Maps Place Search.
23-2. Exception Dialog
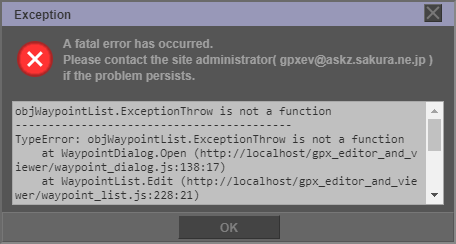
If a fatal error occurs, an "Exception Dialog" is displayed. Please contact the email address displayed in the dialog. Details of the error are output in the text area.
23-3. Google Maps API Error
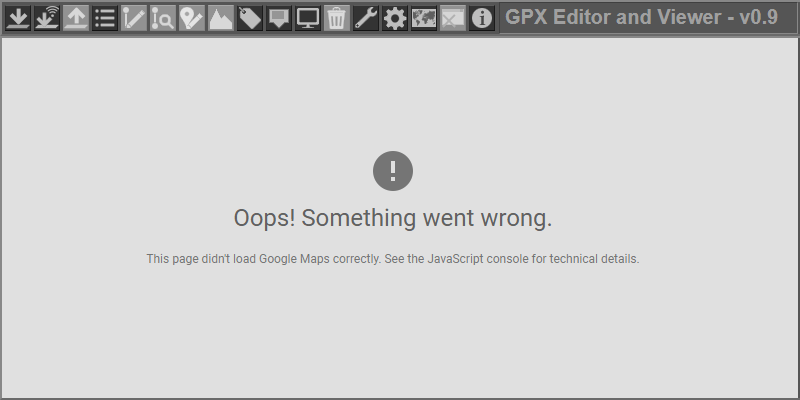
If the above message is displayed on the screen, a Google Maps API error has occurred. The following causes are possible.
- It's possible that you exceeded the Google Cloud Platform free quota limit for the current month. In this case, please register your API Key in the Configuration Dialog.
- The API Key set in the Configuration Dialog or the API Key (api_key value) specified in the CGI parameter may be incorrect. Please check the value again.
- The Google Maps API version you are using may no longer be supported. If API Version (api_version) is specified for the CGI parameter, change the parameter value.
- The service may be stopped due to some trouble on the Google server side.
23-4. Initialize

If GPXEV does not start normally even after restarting the browser, the saved cookie (setting) may be damaged. Please delete your browser cookies. You can also initialize the cookie by accessing the following URL.
https://askz.sakura.ne.jp/gpxev/gpx_editor_and_viewer.cgi?mode=init